2 (or more) maps, 1 mxd
This is a production technique I use to create multiple maps in one mxd utilizing data driven pages. The cool part about this is that I’m creating truly different maps here, not a series of the same map in different places. The first step is to create an index layer that controls the map title, extent, and scale. Coupled with that, corresponding grouped layers with scale dependencies make it possible to produce 4 (or more) different maps using one mxd.
First, create an empty index layer, I’ll use points for this example. I usually add the same set of fields to any index layer I create, here’s the script I use every time:
import arcpy

from arcpy import env
env.workspace = r"L:\Projects\NOAA_Aquarius\01_Data\Aquarius.gdb"

in_table = "**FCName**"
arcpy.AddField_management(in_table,"Title","TEXT","","50")

arcpy.AddField_management(in_table,"SubTitle","TEXT","","100")

arcpy.AddField_management(in_table,"Sort","SHORT")

arcpy.AddField_management(in_table,"Rotation","FLOAT")

arcpy.AddField_management(in_table,"Scale","LONG")
Just change the workspace and in_table to point at your freshly created index point feature class and you’re set (The index layer used in this example was created with an older version of this script, so the field names don’t match exactly).
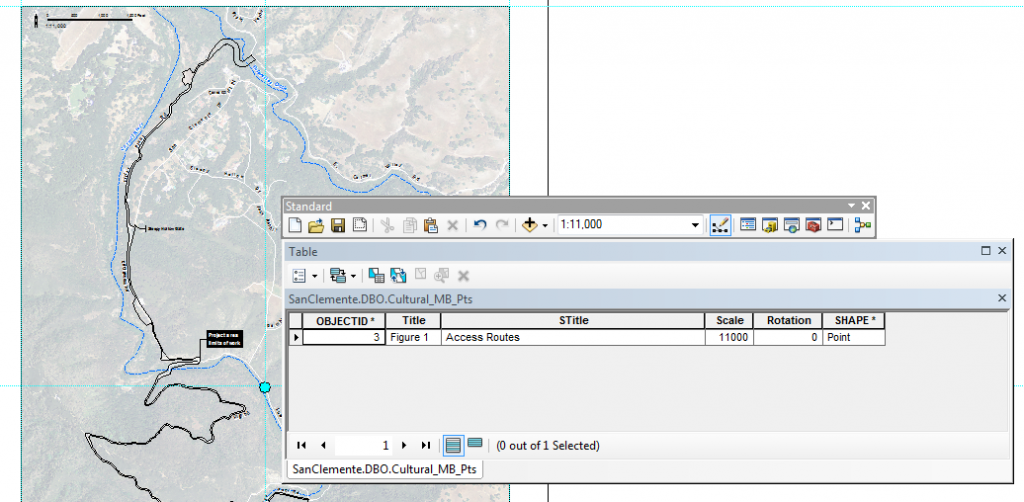
Now, zoom to the extent of your first map. The first map extent is shown below with some of the common layers included in each map. Notice that I’m in layout view and I have added guides that intersect at the center of the map frame, not the layout, but the map frame. I’ll use these guides to add points to the index layer and lay out my map extents.
Round the map scale, for this map it’s 1:11,000. Next, start editing the index point layer and add a point where the two guides intersect in the center of the map frame – see the blue dot below. Add the title and sub title for the first map as attributes in the index point table. “Figure 1” and “Access Routes”, respectively, for this map. More importantly, make sure to record the scale, “11000”.
At this point you can add the layers you need for the first map and hone the symbology and labeling. After you’ve added the layers corresponding to the first map, group them, excluding the common layers. Now go into the group layer properties (double-click or right-click>properties) and on the general tab, set the Scale Range to not show the group out beyond 1:12000 nor in beyond 1:10000.
The group layer should look like this when the map scale is outside this range. Note the group layer has been renamed “Figure 1 Access Routes” to easily relate it to the index layer.
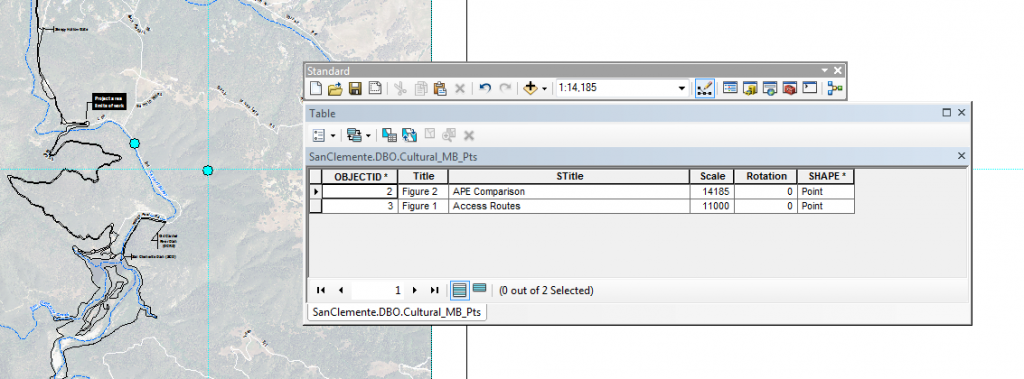
Now pan/zoom to the next map extent. The next map is slightly zoomed out and skewed east. Repeat the steps laid out above to create a second point at the center of this map frame and add the title, sub title, and scale information.
Notice the first index feature is also visible.
Next add the appropriate layers for the second map and group them, setting a scale range for the group layer around the scale for the second map – in this case not showing the group out beyond 1:15000 nor in beyond 1:14000.
The second group layer should look like this when the map scale is outside its range.
Now we can set up data driven pages using our index point layer. Make sure to assign the scale based on the attribute recorded in the index layer. Make sure to use dynamic text in the title block to automate the title and subtitle of the map corresponding to the layers shown. Note that the property in these tags correspond to fields in the index layer.
<bol><acp><dyn type="page" property="Title"/></acp></bol>
<_bol><acp><dyn type="page" property="STitle"/></acp></_bol>
With the map symbology, labeling and legend properties set you can cycle through the pages and watch the map change with the page. Make sure to turn off the index layer so that it doesn’t show on the map.
Map 1
Map 2
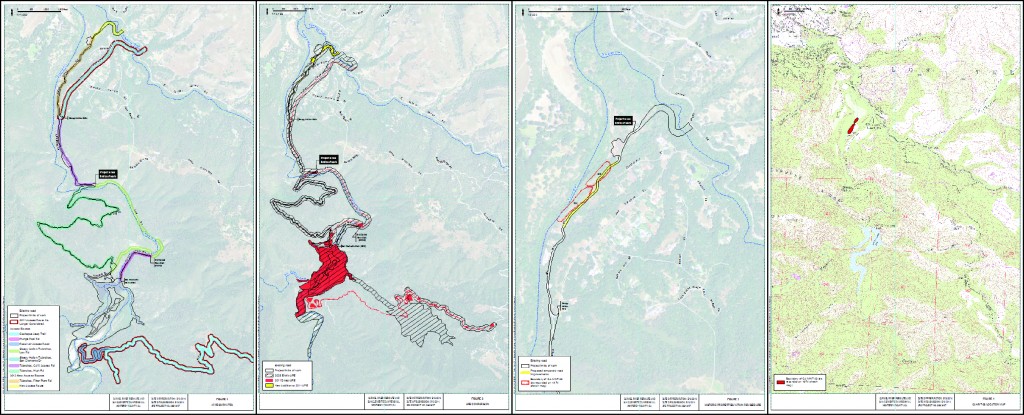
The actual production mxd that was borrowed for this article includes four different map layouts in one mxd as seen below – all of these maps were created from the same mxd. Once the map is set up in the manner described above, four different maps with different symbology, labeling, titles, and scales are automatically created:
This technique can also be used to create a series of maps in the same spot, at the same “scale”. I’ll go more into depth on this in an upcoming article but basically you create your index point and copy it in place, then change the scale by one for each individual map (ie 1:999, 1:1000, 1:1001) and set the scale dependency for each group layer so that each only shows at one particular scale.


